Sections:
Introduction:
Many modern TVs now include an extra frames feature, usually either 120Hz or 240Hz. This just means they take the source video, which is usually between 24-30FPS, and add new, interpolated frames between the original frames that make the motion look much more smooth.
High framerate (HFR at 48fps) was used in The Hobbit and will be used in upcoming films like the Avatar sequels, so why not watch all your movies at higher framerates?
A lot of people don’t realize this, but 99% of TVs made before this feature was introduced are actually capable of displaying 50FPS and 60FPS, and of course most LCD monitors display 60FPS as well.
This tutorial will allow you to convert videos of any framerate to higher framerates; 25FPS becomes 50FPS and 24/30FPS becomes 60FPS by default, or you can specify whichever framerate you want.
This script offers greater quality than any televisions I have seen.
I’m sure many people will want to see how well this script works, so here’s a comparison:
Original File
Converted File
Note: This can now be done in realtime using Universal Media Server!
Purpose:
This post provides instructions on how to easily convert any video to 60FPS, which allows you to take advantage of this feature of modern TVs on your computer monitor or TV without actually buying anything.
Step 1:
The files needed for this step are found in this zip folder (~3MB).
Run and install the file AviSynth.exe.
It is an early version of AviSynth 2.6 that is more stable and faster for multithreading than 2.5 releases.
Download and install MeGUI, run it, let it update all the things it wants to and import all of the presets.
Optional Tip: If you want MeGUI to update to the very latest stuff (at your own risk) you can push ctrl+s, go to the Extra Configuration tab, and in the Auto Update section select “Use development update server”
Close MeGUI and extract the files in the tools folder from our zip file into your MeGUI tools folder, which for most people will be either C:\Program Files (x86)\MeGUI\tools\ or C:\Program Files\MeGUI\tools\.
Step 2:
Download and install MKVToolnix.
When that is installed, run MKVMerge (Start Menu -> All Programs -> MKVToolnix -> mkvmerge GUI).
You will also need codecs installed. If you don’t already have them I recommend K-Lite Mega Codec Pack. If you install K-Lite, make sure to select “Profile 9: Lots of Stuff” during installation.
Step 3:
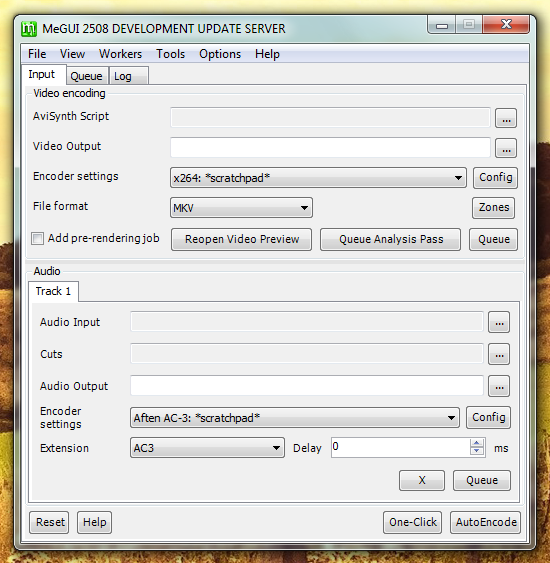
Start MeGUI again. You should be left with a window that looks similar to this:
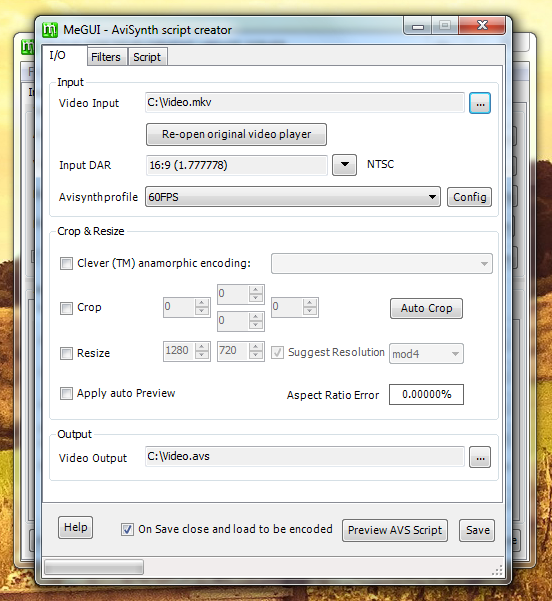
Step 4:
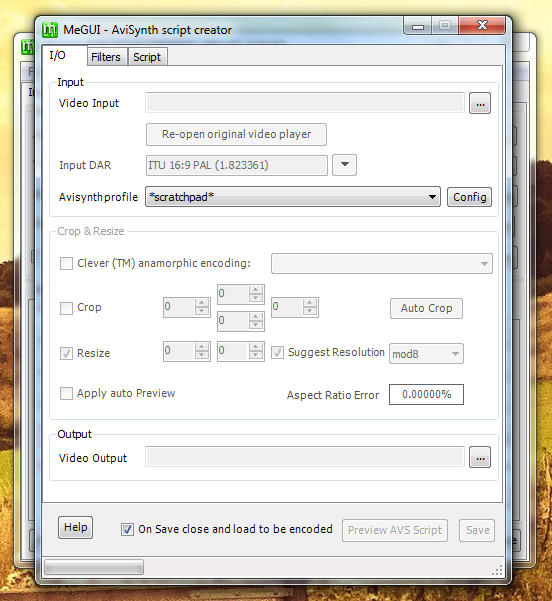
Push ctrl+r, or go to Tools -> AVS Script Creator.
Now you should see something like this:
Step 5:
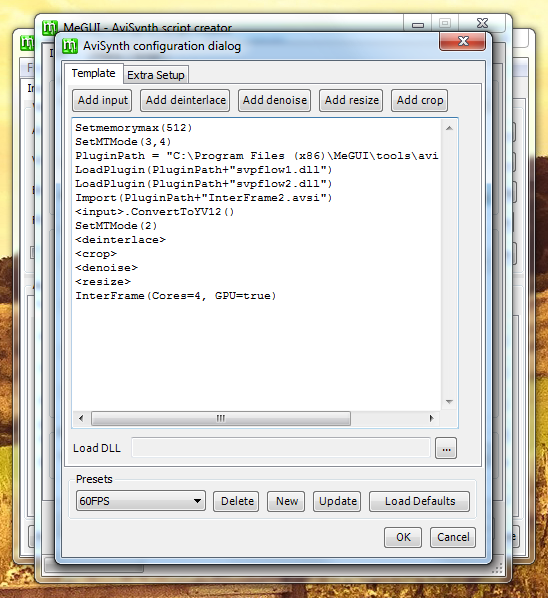
Click the Config button next to Avisynth profile.
It should look like this:

Step 6:
Click the New button down the bottom and type 60FPS in the name box, so it should look like this:

Step 7:
Now for the script that will do the actual 60FPS conversion.
Just copy and paste the following code into the text input area.
Cores=4

SetMemoryMax(512)

SetMTMode(3,Cores)

PluginPath = "C:\Program Files (x86)\MeGUI\tools\avisynth_plugin\"

LoadPlugin(PluginPath+"svpflow1.dll")

LoadPlugin(PluginPath+"svpflow2.dll")

Import(PluginPath+"InterFrame2.avsi")

<input>.ConvertToYV12()

SetMTMode(2)

<deinterlace>

<crop>

<denoise>

<resize>

InterFrame(Cores=Cores)
Important note #1: Make sure the path on the third line is correct.
For example, if you are running 32-bit Windows, you will need to modify the path to “Program Files” instead.
Important note #2: You should change the number “4” in the script (on line 1) to your number of CPU cores. If you don’t know how many cores your CPU has just Google your CPU and you should be able to find the specs somewhere, or 4 should be fine anyway.
Important note #3: If you have a video card, you can improve quality by adding “GPU=true” to the script. However, it may make encoding time slower, so take that into account.
So InterFrame(Cores=Cores) would turn into InterFrame(Cores=Cores, GPU=true)
If you do this, you may also need to go into your MeGUI tools folder (usually C:\Program Files (x86)\MeGUI\tools\x264) and rename the file opencl.dll to opencl.dll.bak. This will let MeGUI use the version of opencl.dll that your video card drivers have installed, instead of the generic one from MeGUI.
Important note #4: This script always outputs either 50FPS or 59.94FPS (60FPS) for compatibility reasons. If you want to always double the framerate instead, so that for example 23.976FPS turns into 47.952FPS (48FPS), you can use the “FrameDouble” parameter.
So InterFrame(Cores=Cores) would turn into InterFrame(Cores=Cores, FrameDouble=true)
So now your window should look similar to this (with different text):
Step 8:
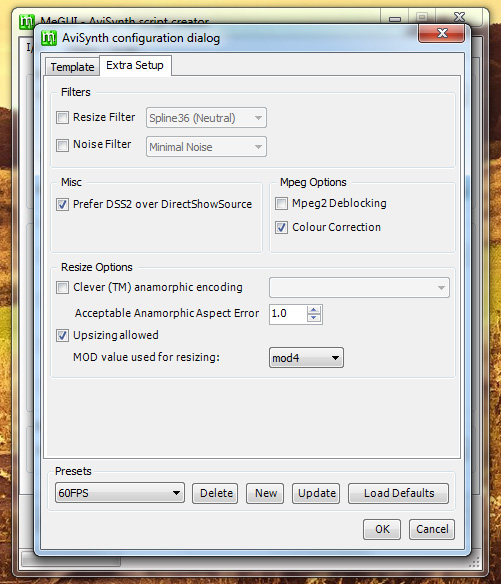
Click the Extra Setup tab and make sure “Prefer DSS2 over DirectShowSource” is checked.
Optional tip #1: You might also want to choose your preferred resizer. For aspect-ratio changes (like from 720×576 to 720×480) a neutral filter like Spline36 will be nice. For actual resizing (like from 1920×1080 to 1280×720) a sharp filter like Spline64 will be best. I usually just leave it on Spline36. Make sure to untick the checkbox on the option after you change the default resizer, otherwise it will always be used by default which is often unnecessary.
Optional tip #2: I recommend changing the “MOD value used for resizing” to mod4. This gives the best balance between compatibility (a lot of devices like PS3 don’t have good mod2 support) and aspect ratio accuracy (the higher the MOD value, the more likely the aspect ratio is to be skewed more heavily).
Now it should look something like this:
Then just click the Update button then the OK button
Step 9:
Now we’re back to the AviSynth script creator window and now that we have our 60FPS AviSynth template made and selected, it’s time to choose which video we want. Just click the … button next to Video Input up the top of the window and find your video, then click Open.
A window will pop up with buttons, click the option on the right, usually either “DirectShowSource” or “AviSource”.
A window will pop up to show you the video, you can just close that.
Now you should see something like this:
Step 10:
Click the Save button. The video preview window might pop up again, you can close it again.
Step 11:
Now is the time when you need to choose the quality of the video and audio.
If you don’t know what to do here, something quick and easy is to just use CRF, which means you let the codec decide on the bitrates itself. So you can click the “Config” button next to the “Encoder settings” dropdown when you have a x264 option selected, then just enter a number between 16-20 in the “Quality” input box. 16 means your video will be almost exactly the same quality as the source, while 20 will look good too while taking up less space. Personally I use 16 for everything because why not? 🙂
So when you have your quality, click Queue in the Video encoding section.
Step 12:
Now your video is ready for conversion.
Now just go to the Queue tab and click Start down the bottom, then wait for it to finish.

Step 13:
The final step is to add your audio and/or subtitles from the original file to the converted file. This process uses muxing, not conversion, so there is no quality loss.
For this we will use the program we installed earlier, MKVMerge.
So run that and drag the converted file into that program, then do the same with the original file. If you can’t drag them on, you can use the add button instead.
Now you have several items in the Tracks, chapters and tags section. You just need to untick the ones you don’t want. Usually you will want to leave them all selected except for the original video track, as I’ve done in the following example:

Finally, set the Output filename down the bottom of the window and click Start muxing.
When that is done, you have your final video!
Final Thoughts:
This might seem like a long process, but actually it is only long once. Since we have now made templates, the process for the videos from now on will be much faster; instead of entering the script each time, now you can just make sure your 60FPS AviSynth script is selected.
This file can now be played just like any other video. I personally watch videos on my TV which is linked up to my computer using the awesome, free program called Universal Media Server, and that handles these 60FPS videos perfectly with no configuration.
Any comments are appreciated. If you can think of an improvement to the script, or to the process, or if you just found it useful and want to say thanks, please do leave a comment. I would love to know that it’s being used.
If you want to donate to help me with server costs and time spent keeping this article updated, you can do so here with my thanks 🙂
FAQ:
- How can I fix random crashing of vfw4x264.exe?
This probably means you are encoding a file using an input mode other than DSS2, which can happen if the clip is .m2ts or .dga (blu-ray) or another uncommon format.
You can fix it by changing the 2 in the second line of the script to either 3, 4, 5 or just removing that line (try them in that order, since the options get progressively slower) - The option “Prefer DSS2 over DirectShowSource” is disabled. or
I get an error like “can’t load avss.dll”.
This means your computer is missing Haali Media Splitter. You can download it here or as part of a K-Lite Mega Codec Pack and the error should go away after you install it. If you install K-Lite, make sure to select “Profile 9: Lots of Stuff” during installation. - The file stops encoding after 99%.
This usually indicates a codec configuration issue. Try installing/reinstalling K-Lite Mega Codec Pack, and make sure to let it select its preferred defaults (not “quick upgrade”) - Can I customize the output framerate to make it 48FPS, 75FPS, 120FPS, or anything else?
Yes, you can choose any framerate you want. It is best to choose a framerate that is divisible in some way with the original video, but even that is your choice. You just need to add the options “NewNum” and “NewDen”, like this:
InterFrame(Cores=Cores, NewNum=48000, NewDen=1001)
NewNum stands for “New Numerator” and NewDen stands for “New Denominator”. In general, with NTSC material the NewDen should be 1001 and the NewNum should be 1000x your desired framerate (so for 48FPS you want 48000 and 1001) while for PAL content you might just want something like NewNum=75,NewDen=1 to output 75FPS content. - The output seems choppy, can I make it smoother?
Yes, by default we output a video that sacrifices a little smoothness in order to reduce errors, but different people’s eyes pick up on different things so it can all be a matter of taste. You can try the Smooth tuning, like this:
InterFrame(Cores=Cores, Tuning="Smooth")
Also, using GPU mode produces more accurate results and therefore should appear smoother, though it can be slightly slower overall. You can try it like this:
InterFrame(Cores=Cores, GPU=true)
Or try both options at once like this:
InterFrame(Cores=Cores, Tuning="Smooth", GPU=true) - Why isn’t the GPU being used much in GPU mode?
Only some things are done with the GPU in GPU mode, it’s still mostly done by CPU but helped by GPU. - Why is the video still the original framerate after running it through MKVMerge?
You probably selected the wrong tracks in MKVMerge so you’re getting the original video track instead of the new one; make sure you untick the original video stream before muxing. - Why does MeGUI give an error “SVSmoothFPS: unable to load library given in ‘compose’ […svpflow2.dll]
Try re-installing or updating your video card drivers, and if that doesn’t work then maybe your video card doesn’t support OpenCL so remove GPU=true from your script. - Why am I getting the error “SVSmoothFps: unable to load library given in ‘compose'” when I try to run the encoding process, but not when I preview?
Go into your MeGUI tools folder (usually C:\Program Files (x86)\MeGUI\tools\x264) and rename the file opencl.dll to opencl.dll.bak. This will let MeGUI use the version of opencl.dll that your video card drivers have installed, instead of the generic one from MeGUI. - Why am I getting the error “Error message for your reference: Can not read the video stream”?
MeGUI can’t read from folders or files with certain characters, so try moving the video to a different folder and/or renaming the file.
Thanks:
Widezu69 for providing the original AviSynth script that I used as a base.
Fizick for MVTools, the library that does all the work, and SVP for the modifications to MVTools that make it even better for our purposes.
Everyone on various forums for their feedback, this is really a community effort.
Changelog:
21/05/2015:
- Updated InterFrame to 2.8.2, which improves speed
16/03/2015:
- Corrected and improved the instructions and FAQ
05/03/2015:
- Updated InterFrame to 2.8.0, which improves speed and lowers memory usage
- Updated conversion script
24/02/2015:
- Updated the instructions and FAQ
27/09/2014:
- Updated InterFrame to 2.6.0
- Added a tip about using framedoubling mode
- Updated most images to reflect the minor changes to MeGUI
- Minor improvements to instructions
22/07/2014:
- Added more items to the FAQ
10/07/2014:
- Added more items to the FAQ
- Shortened the changelog to only the latest 3 changes by default
20/05/2014:
- Updated instructions
- Added more tips
- Added to and updated the FAQ
- Updated the link to MKVToolnix to always point to the latest version
September 27, 2011 at 3:06 pm
@Dr. Strangelove: I’ve had that before and it’s been fixed by uninstalling and installing K-Lite Mega. Also make sure you don’t install the 64-bit codec pack, just the regular one.
September 27, 2011 at 3:54 pm
Ok well that worked but now I get an “800700e” error which is an out of memory error. Dang….
September 27, 2011 at 3:59 pm
@SubJunk: alright so I’ve gotten all the steps work (randomly). now the problem is the final video isn’t showing at 60FPS like the sample in the tuturial is. its playing at around 25frames. I copied and pasted the script and fixed the file path line. what I’m I doing wrong. thanks again.
September 27, 2011 at 4:03 pm
@Dr. Strangelove: Try changing the number on the first line from 1024 to 600
@60FPS FTW: Can you post the MediaInfo of the converted file?
September 28, 2011 at 7:26 am
@SubJunk: first of all thanks for the quick and patient replies. and heres the media file info:
Format : Matroska
Format version : Version 2
File size : 6.97 GiB
Duration : 2h 34mn
Overall bit rate : 6 462 Kbps
Encoded date : UTC 2011-09-27 03:07:27
Writing application : mkvmerge v4.6.0 (‘Still Crazy After All These Years’) built on Mar 10 2011 02:50:32
Writing library : libebml v1.2.0 + libmatroska v1.1.0
Video
ID : 2
Format : AVC
Format/Info : Advanced Video Codec
Format profile : High@L4.1
Format settings, CABAC : Yes
Format settings, ReFrames : 5 frames
Codec ID : V_MPEG4/ISO/AVC
Duration : 2h 34mn
Bit rate : 5 437 Kbps
Width : 1 280 pixels
Height : 528 pixels
Display aspect ratio : 2.40:1
Frame rate : 23.976 fps
Color space : YUV
Chroma subsampling : 4:2:0
Bit depth : 8 bits
Scan type : Progressive
Bits/(Pixel*Frame) : 0.336
Stream size : 5.73 GiB (82%)
Writing library : x264 core 116 r2044 392e762
Encoding settings : cabac=1 / ref=5 / deblock=1:0:0 / analyse=0x3:0x133 / me=umh / subme=7 / psy=1 / psy_rd=1.00:0.00 / mixed_ref=1 / me_range=16 / chroma_me=1 / trellis=1 / 8x8dct=1 / cqm=0 / deadzone=21,11 / fast_pskip=0 / chroma_qp_offset=-2 / threads=12 / sliced_threads=0 / nr=0 / decimate=1 / interlaced=0 / bluray_compat=0 / constrained_intra=0 / bframes=3 / b_pyramid=2 / b_adapt=2 / b_bias=0 / direct=3 / weightb=1 / open_gop=0 / weightp=2 / keyint=250 / keyint_min=23 / scenecut=40 / intra_refresh=0 / rc_lookahead=50 / rc=2pass / mbtree=1 / bitrate=5437 / ratetol=1.0 / qcomp=0.60 / qpmin=0 / qpmax=69 / qpstep=4 / cplxblur=20.0 / qblur=0.5 / ip_ratio=1.40 / aq=1:1.00
Language : English
Audio #1
ID : 1
Format : AC-3
Format/Info : Audio Coding 3
Mode extension : CM (complete main)
Codec ID : A_AC3
Duration : 2h 34mn
Bit rate mode : Constant
Bit rate : 384 Kbps
Channel(s) : 2 channels
Channel positions : Front: L R
Sampling rate : 48.0 KHz
Bit depth : 16 bits
Compression mode : Lossy
Stream size : 424 MiB (6%)
Audio #2
ID : 3
Format : AC-3
Format/Info : Audio Coding 3
Mode extension : CM (complete main)
Codec ID : A_AC3
Duration : 2h 34mn
Bit rate mode : Constant
Bit rate : 640 Kbps
Channel(s) : 6 channels
Channel positions : Front: L C R, Side: L R, LFE
Sampling rate : 48.0 KHz
Bit depth : 16 bits
Compression mode : Lossy
Stream size : 707 MiB (10%)
Language : English
September 28, 2011 at 7:55 am
@SubJunk: My bad! I made a mistake. I wasn’t encoding the video properly. I think I figured out the problem. HOWEVER, theres an error I’m still getting “there no functoin names “SetMTMode”…movie.avs, line 2. The function, however, is there in the script. and is the whole decoding processes suppose to take 8 hours.
September 28, 2011 at 10:23 am
@60FPS FTW: Did you replace avisynth.dll like it says in Step 1? That error is caused by having the default avisynth.dll instead of the other one
September 28, 2011 at 11:59 am
@Subjunk: Thanks so much for helping me. I think I might finally have a grasp of how to do this effectively. I’ll never watch movies the same again. Two more questions: I am currently running on a Quad Core Phenom processor, 4 GB of RAM, Geforce GTX 560 Ti, are there any further tweaks I could use to decrease encoding time or increase quality of the video? Also, after re-encoding a movie, when I run it through a media player, it has to buffer if I fast forward. Is that due to the video size or is that due to the frame rate? Again, thanks a lot for your help.
September 28, 2011 at 1:16 pm
@Dr. Strangelove: You’re welcome 🙂
The quality is at its best right now, though there will be quality improvements coming soon, I often edit the post to improve it. You can increase the speed by adding GPU=true to the InterFrame function if you haven’t already (like it says in Step 7).
To decrease encoding time you can make sure to set x264 to the “Ultra Fast” preset, note that this will make the filesize much larger too. The only other ways to make it faster involve reducing the quality.
The buffer when playing is probably a mix of things. Using that “Ultra Fast” x264 preset will also help with this, since it makes files easier for players to decode.
September 28, 2011 at 2:26 pm
F*^# I give up. I’ve been demoted to noob because of this. I’m getting error after error before I even begin the conversoin or muxing. I wanted this to work so badly. oh well…24FPS, here I come…
September 29, 2011 at 8:52 am
OK im back for round 2!!!
im getting stuck at step 9 again. Heres the link to the picture of the error. perhaps you can point me to the right direction after seeing this.
http://www.flickr.com/photos/20451162@N06/6192594863/
thanks again.
September 29, 2011 at 10:51 am
@60FPS FTW: Welcome back 🙂 That screenshot shows you didn’t follow Step 8 properly, please go over that again 🙂
September 29, 2011 at 12:14 pm
OK so I finally got some videos to work at 60FPS and muxing went successfully and the results were worth waiting for. However, I have one more problem which needs to be tackled: “direct show cannot render file. you probably don’t have the right filters installed.”
So what do I do. My test movies worked; however, the movies that I really want to see at 60FPS, that are in MKV format are iving me that error.
thanks for the welcome and your help.
September 29, 2011 at 12:23 pm
@60FPS FTW: It probably means the codecs are missing or wrong. Uninstall whatever codecs you have, restart the computer, then install K-Lite Mega 🙂
September 29, 2011 at 1:39 pm
@subjunk: Man this is a tiresome ordeal. Am I the only one going through this much trouble. Perhaps you can help me with this error: “fatal error…could not load file or assembly “mediainfowrapper, version 0.7.33.0…” what file or program is associated with the installation of that file?
thanks again. I am this close to total success.
September 29, 2011 at 2:56 pm
@subjunk: I’ve almost got it…again…I’ve got this error now:
http://www.flickr.com/photos/20451162@N06/6193438987/
I’m only one step away from having a 60FPS copy of a movie. I’m loading an MKV file and from the looks of it, the majority of the mkv movies I have don’t seem to be working.
thanks again.
September 29, 2011 at 6:08 pm
@60FPS FTW: Other people have had problems before but you’re definitely in the lead for the highest number of them 🙂 It’s OK, sometimes it just goes like that 🙂
That error says it’s a problem with line 8 of “Avatar (1).avs” so please paste the unchanged contents of that file so I can see
September 30, 2011 at 4:46 am
@subjunk: Here are the contents of the avs file for the selected movie:
Setmemorymax(1024)
SetMTMode(2,16)
PluginPath = “C:\Program Files (x86)\MeGUI\tools\avisynth_plugin\”
LoadPlugin(PluginPath+”mvtools2.dll”)
LoadPlugin(PluginPath+”RemoveGrainSSE3.dll”)
Import(PluginPath+”InterFrame.avsi”)
LoadPlugin(“C:\Program Files (x86)\K-Lite Codec Pack\Filters\Haali\avss.dll”)
dss2(“M:\Movies\Avatar.mkv”, fps=23.976).AssumeFPS(24000,1001).ConvertToYV12()
#deinterlace
#crop
#denoise
#resize
InterFrame(FlowPath=PluginPath)
September 30, 2011 at 6:57 am
@subjunk: I’ve managed to convert a few avi file format videos to 60FPS and the results are magninficant. it’s the MKV I’m having problems with.
September 30, 2011 at 1:31 pm
@subjunk: and also, why do some files only encode at single digit frame processing ratewhile others encode at triple digit? thanks
October 2, 2011 at 1:39 pm
How do I add a high quality deinterlace to the reencoding? The deinterlace options are greyed out for me but I know the source video is interlaced.
October 3, 2011 at 7:55 am
@60FPS FTW: If some containers work while others don’t it means the codecs are either missing or not configured properly. Make sure when you install K-Lite Mega that you select the setting called something like “lots of stuff”.
Some videos are faster than others usually because they have less pixels or a faster codec/codec settings.
@Josh: The deinterlacer I use is QTGMC which you can get here: http://forum.doom9.org/showthread.php?p=1478426
October 3, 2011 at 1:58 pm
@SubJunk: I’ve managed to figure out another way to get this to work. Mind you, its longer but it works. I first convert the original MKV to HD Xvid AVI using a converter with quality settings to max. Megui seems to read the AVis no problem.
I’ve managed to convert about 6 movies so far and I love it. Even though the original method didn’t work, I want to thank you for this tutorial regardless because I wouldn’t have been able to do it without it. Good Luck with your future projects.
October 3, 2011 at 2:09 pm
It appears that doom9 or my ISP is having problems since I can’t seem to visit their website. I seem to be having a problem with reencoding though.
My source is a DVD-9 disk. I used a tool (I can’t remember the name but I am not on the machine that has it) to rip the mpeg-2 stream from the DVD for the TV episode I am testing with. I can watch the original ripped file from the DVD (.mpg) file with zero problems. (Note that I did not copy the .vob files and rename them. LOL.) However, after performing the reencode I have a 50fps video(the DVD is PAL format) and the video is smooth as silk. My computer has 2 core i7 processors (SR-2 motherboard) so I originally chose 1.8×16(28) for the SetMTMode line of the AVS script. I had a large number of occurrences where frames were out of order. I lowered the number and performed several other reeencodes eventually using your default line of “SetMTMode(2,0)”. Each time I changed the number to something lower than 28 the number of out-of-order frames would slowly decrease. At zero however, I still get out of order frames. I have verified that the adding of the audio track using mkvmerge was not responsible since the .mp4 file shows the same errors. I even went so far as to go frame by frame and I can identify the exact frames where the errors occur. Any idea what could be causing this? I have no other problems at all except this one and I am baffled as to how some frames could be out of order while the total number of frames and the total time for the video is unchanged.
October 6, 2011 at 10:55 am
I have an issue trying to re-encode to 60FPS on my laptop. All the scripts are the same as on my desktop which re-encodes video at 60FPS but for some reason my laptop only encodes at about 30 frames. Anyone have this issue?
October 7, 2011 at 3:20 pm
Following the guide to a T and the problem I run into is that at 98%, the conversion just stops. CPU is still maxed out, but the frame count stops. This was on a Windows 7 32bit with 4GB ram. I have a dual boot of the windows 8 64bit preview. Followed the direction again, and it surprisingly stopped at the same frame. I have to imagine this is a source file issue? When the preview comes up I am able to play it all the way through without issue. The source is an MKV if that matters, any suggestions? Should I convert the video to something else first? I have gotten one file to work in the past, and looove this 60fps, thanks for the efforts.
October 7, 2011 at 7:52 pm
@Jason: That can be a bug with .mp4 files and I think it can be fixed by using MKVMerge to remux the file to .mkv before you start converting.
@Strange: The scripts or files must be different
@Josh: Yeah, doom9 has been having timeout problems lately. Can you make sure you’re using DSS2 and not DirectShowSource?
@60FPS FTW: I’m glad you somewhat got it working 😉
October 8, 2011 at 12:10 pm
SubJunk thank you, after the remux, all the video’s I was attempting started going through. Cheers!
October 15, 2011 at 3:07 am
Please help..I did all the set up right. And when I got to the point where I’m trying to convert a video at Video Input … It won’t let me saying something about “could not load a ‘MediaInfoWrapper’.”
I don’t have access to DAR or Clever (TM) anamorphic encoding to match your “Resize to mod 16” settings.
? I don’t know what to do.
October 15, 2011 at 9:50 pm
Getting this error when trying to open up a movie in the script creator: could not load file or assembly “mediainfowrapper, version 0.7.33.0″ What am I doing wrong here? Thanks again for the help.
October 22, 2011 at 3:16 pm
After I choose my video input file and click Save, I get this error:
AviSynth script error:
Import: couldn’t open “C:\Program Files\MeGUI\tools\avisynth_plugin\InterFrame.avsi”
InterFrame.avsi is in the folder, as are the other dll’s (libflowgpu.dll, libflowsse.dll, RemoveGrainSSE3.dll, etc).
October 23, 2011 at 12:04 pm
@Chariots: Maybe you’re using 64-bit Windows in which case it would be in “Program Files (x86)”
@Strange: Not sure, I guess try uninstalling and installing MeGUI again
October 23, 2011 at 2:22 pm
I am using Vista 32-bit. I’ll try uninstalling and reinstalling all related files.
October 30, 2011 at 2:27 pm
I uninstall everthing, reinstalled, remembered to do the “lots of stuff” option on Klite.
The only thing I didn’t let MeGUI update was neroaacenc. The vid I am working on Is Xvid with MPEG audio.
Still getting error:
Import: couldn’t open “C:\Program Files\MeGUI\tools\avisynth_plugin\InterFrame.avsi”
The file is in that folder.
Any ideas?
October 30, 2011 at 2:38 pm
update: Also installed the neroaacenc, still same error . Tried it with two different avi files. No luck.
November 2, 2011 at 3:50 am
I want to give SVP a try but I m afraid my CPU (Q6600@3.0ghz) will not be able to handle the high quality settings. So I thought it might be an idea to covert my movies. This way my cpu gets unloaded during playback because it s already converted to 60fps right? The disadvantage of course will be the time the coversion will take (I think) for a 2 hour full Blu-Ray rip.
But I m going to try it and have some first questions already before I even tried it 😀
Does this conversion method support .m2ts, .mkv and BR structure (BDMV)?
November 2, 2011 at 10:35 am
@THX-Ultrall: It supports any format that your computer can play, so it depends on your codecs.
November 6, 2011 at 10:44 pm
@SubJunk: Great guide, easy to follow. FAQ answered the few errors i had during setting this up. I’m also using your version of PS3MS, it’s the best!
November 8, 2011 at 2:22 pm
Great guide. Ran into some issues with missing modules/plugins and had to do some googling but once all were in place and MeGUI was updated/configured it worked great.
Thanks!
November 9, 2011 at 12:25 pm
I never figured out the issue with not being able to use my laptop. Chalk it up to old hardware I guess…. However, I was wondering if there’s a setting or something that eliminates the “ghosting” effect whenever there’s fast motion onscreen?
November 12, 2011 at 4:58 pm
I solved my problem, and here are some notes to help others:
* I had to move InterFrame.avsi to a folder where the user read/write permissions worked out. For some reason, when I had it in the correct plugin folder, it wouldn’t work. Probably my fault for how I copied over the files, who knows.
* Some wmv files work, but some don’t and just hang at 99.xx%. This forum has other posts with info about that, I haven’t explored it yet.
Maybe my eye is not the best. Converting from 25 or 30fps to 60fps does look a bit better, but not mind-blowing to me. Do I need to use a solid HD source (720p, etc) to realize the full benefits? The best improvement I have found, is taking 14 to 20fps vids, and converting them to 60fps. Those rough-looking vids suddenly are very watchable.
Thanks!
November 16, 2011 at 2:36 am
Hi, the output video has incredible quality, it’s so smooth :-D, I can’t believe how nice it looks.
But, encoding is incredible slow, only about 3 fps using (3 years old processor) 2 cores (3 GHz). I’ve got HD6450 but it is not used even if I put “InterFrame(FlowPath=PluginPath, GPU=true)” to the script.
I use Win 7 ultimate 64bit and got last gpu drivers.
Are there other ways to use GPU?
Thanks
November 16, 2011 at 10:03 am
@klerik: Thanks for the feedback 🙂 Have you tried updating your ATI drivers? I think some older drivers are incompatible.
November 18, 2011 at 2:10 am
my drivers are now only 2 days old 🙂 but gpu is still unused
I will try use another PC with nVidia card…
November 24, 2011 at 4:25 am
I find a fatal error, see “MeGUI encountered a fatal error and may not be able to proceed. Reason: The file C:\60fps test.avs cannot be opened.
Error message for you reference: Script error: there is no function named “SetMTMode” (C:\60fps test.avs, line2)
You can help me with is?
November 24, 2011 at 10:14 am
@Titty: It probably means you didn’t replace avisynth.dll
November 25, 2011 at 8:07 pm
I get stuck at like 99.99% I have like 3 frames left but it’s just stuck. Any solutions?
November 26, 2011 at 10:18 am
@tysja: It’s a common bug with .mp4 files, so if your file is .mp4 try muxing it into .mkv before converting.
November 30, 2011 at 7:41 am
Great guide, followed the instructions and it works and plays beautifully! Thank you so much. One of the main draws, IMO, is being able to reduce playback to 1/2 speed and have it still be smooth. So question: Can I scale videos to 120fps for even smoother slow-mo?
November 30, 2011 at 9:48 am
@Great Guide: Cool, glad you like it 😀 Sure, you can use any framerate you like. Check out the InterFrame documentation at http://www.spirton.com/uploads/InterFrame/InterFrame.html to see the options. However, remember that the more frames there are the less accurate each one will be. It won’t matter if you’re playing it at full speed because our eyes don’t work that fast, but at slow-motion speeds it may be better to use a lower framerate for more accuracy, but maybe not too. Try both and see what you prefer 🙂