Sections:
Introduction:
Many modern TVs now include an extra frames feature, usually either 120Hz or 240Hz. This just means they take the source video, which is usually between 24-30FPS, and add new, interpolated frames between the original frames that make the motion look much more smooth.
High framerate (HFR at 48fps) was used in The Hobbit and will be used in upcoming films like the Avatar sequels, so why not watch all your movies at higher framerates?
A lot of people don’t realize this, but 99% of TVs made before this feature was introduced are actually capable of displaying 50FPS and 60FPS, and of course most LCD monitors display 60FPS as well.
This tutorial will allow you to convert videos of any framerate to higher framerates; 25FPS becomes 50FPS and 24/30FPS becomes 60FPS by default, or you can specify whichever framerate you want.
This script offers greater quality than any televisions I have seen.
I’m sure many people will want to see how well this script works, so here’s a comparison:
Original File
Converted File
Note: This can now be done in realtime using Universal Media Server!
Purpose:
This post provides instructions on how to easily convert any video to 60FPS, which allows you to take advantage of this feature of modern TVs on your computer monitor or TV without actually buying anything.
Step 1:
The files needed for this step are found in this zip folder (~3MB).
Run and install the file AviSynth.exe.
It is an early version of AviSynth 2.6 that is more stable and faster for multithreading than 2.5 releases.
Download and install MeGUI, run it, let it update all the things it wants to and import all of the presets.
Optional Tip: If you want MeGUI to update to the very latest stuff (at your own risk) you can push ctrl+s, go to the Extra Configuration tab, and in the Auto Update section select “Use development update server”
Close MeGUI and extract the files in the tools folder from our zip file into your MeGUI tools folder, which for most people will be either C:\Program Files (x86)\MeGUI\tools\ or C:\Program Files\MeGUI\tools\.
Step 2:
Download and install MKVToolnix.
When that is installed, run MKVMerge (Start Menu -> All Programs -> MKVToolnix -> mkvmerge GUI).
You will also need codecs installed. If you don’t already have them I recommend K-Lite Mega Codec Pack. If you install K-Lite, make sure to select “Profile 9: Lots of Stuff” during installation.
Step 3:
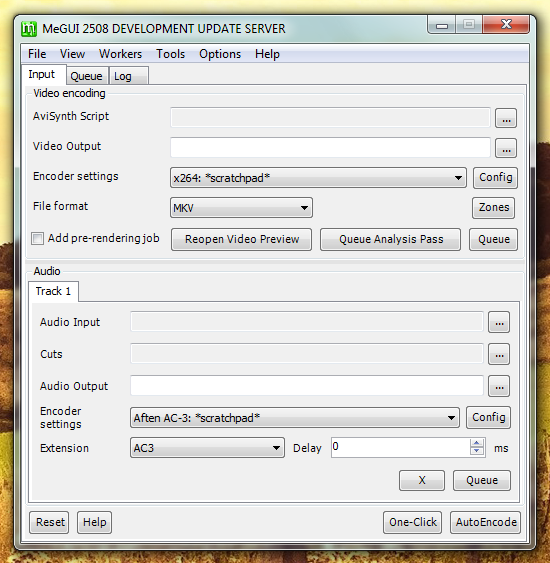
Start MeGUI again. You should be left with a window that looks similar to this:
Step 4:
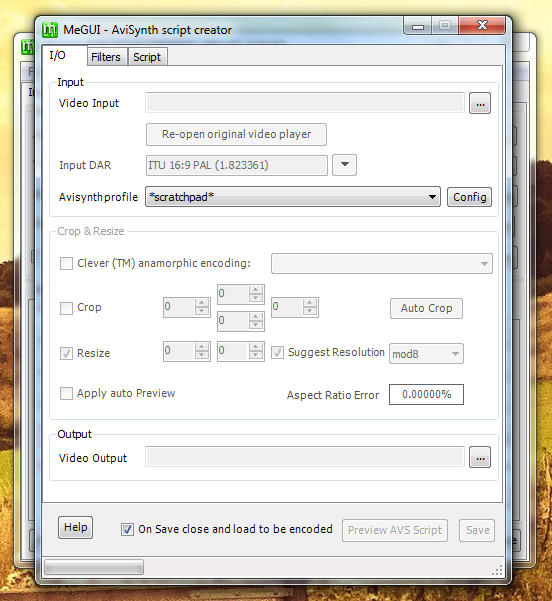
Push ctrl+r, or go to Tools -> AVS Script Creator.
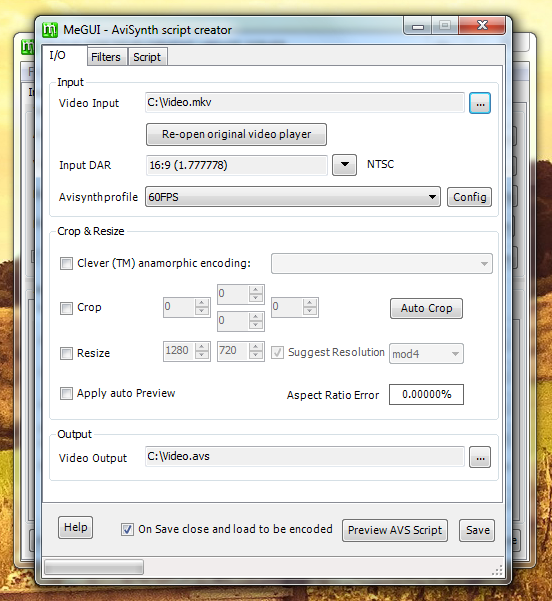
Now you should see something like this:
Step 5:
Click the Config button next to Avisynth profile.
It should look like this:

Step 6:
Click the New button down the bottom and type 60FPS in the name box, so it should look like this:

Step 7:
Now for the script that will do the actual 60FPS conversion.
Just copy and paste the following code into the text input area.
Cores=4

SetMemoryMax(512)

SetMTMode(3,Cores)

PluginPath = "C:\Program Files (x86)\MeGUI\tools\avisynth_plugin\"

LoadPlugin(PluginPath+"svpflow1.dll")

LoadPlugin(PluginPath+"svpflow2.dll")

Import(PluginPath+"InterFrame2.avsi")

<input>.ConvertToYV12()

SetMTMode(2)

<deinterlace>

<crop>

<denoise>

<resize>

InterFrame(Cores=Cores)
Important note #1: Make sure the path on the third line is correct.
For example, if you are running 32-bit Windows, you will need to modify the path to “Program Files” instead.
Important note #2: You should change the number “4” in the script (on line 1) to your number of CPU cores. If you don’t know how many cores your CPU has just Google your CPU and you should be able to find the specs somewhere, or 4 should be fine anyway.
Important note #3: If you have a video card, you can improve quality by adding “GPU=true” to the script. However, it may make encoding time slower, so take that into account.
So InterFrame(Cores=Cores) would turn into InterFrame(Cores=Cores, GPU=true)
If you do this, you may also need to go into your MeGUI tools folder (usually C:\Program Files (x86)\MeGUI\tools\x264) and rename the file opencl.dll to opencl.dll.bak. This will let MeGUI use the version of opencl.dll that your video card drivers have installed, instead of the generic one from MeGUI.
Important note #4: This script always outputs either 50FPS or 59.94FPS (60FPS) for compatibility reasons. If you want to always double the framerate instead, so that for example 23.976FPS turns into 47.952FPS (48FPS), you can use the “FrameDouble” parameter.
So InterFrame(Cores=Cores) would turn into InterFrame(Cores=Cores, FrameDouble=true)
So now your window should look similar to this (with different text):
Step 8:
Click the Extra Setup tab and make sure “Prefer DSS2 over DirectShowSource” is checked.
Optional tip #1: You might also want to choose your preferred resizer. For aspect-ratio changes (like from 720×576 to 720×480) a neutral filter like Spline36 will be nice. For actual resizing (like from 1920×1080 to 1280×720) a sharp filter like Spline64 will be best. I usually just leave it on Spline36. Make sure to untick the checkbox on the option after you change the default resizer, otherwise it will always be used by default which is often unnecessary.
Optional tip #2: I recommend changing the “MOD value used for resizing” to mod4. This gives the best balance between compatibility (a lot of devices like PS3 don’t have good mod2 support) and aspect ratio accuracy (the higher the MOD value, the more likely the aspect ratio is to be skewed more heavily).
Now it should look something like this:
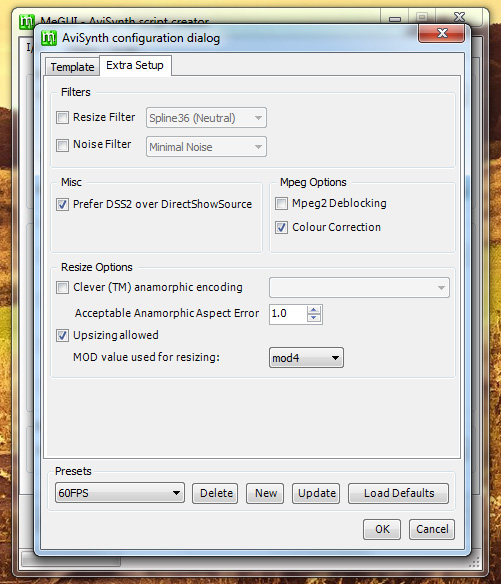
Then just click the Update button then the OK button
Step 9:
Now we’re back to the AviSynth script creator window and now that we have our 60FPS AviSynth template made and selected, it’s time to choose which video we want. Just click the … button next to Video Input up the top of the window and find your video, then click Open.
A window will pop up with buttons, click the option on the right, usually either “DirectShowSource” or “AviSource”.
A window will pop up to show you the video, you can just close that.
Now you should see something like this:
Step 10:
Click the Save button. The video preview window might pop up again, you can close it again.
Step 11:
Now is the time when you need to choose the quality of the video and audio.
If you don’t know what to do here, something quick and easy is to just use CRF, which means you let the codec decide on the bitrates itself. So you can click the “Config” button next to the “Encoder settings” dropdown when you have a x264 option selected, then just enter a number between 16-20 in the “Quality” input box. 16 means your video will be almost exactly the same quality as the source, while 20 will look good too while taking up less space. Personally I use 16 for everything because why not? 🙂
So when you have your quality, click Queue in the Video encoding section.
Step 12:
Now your video is ready for conversion.
Now just go to the Queue tab and click Start down the bottom, then wait for it to finish.

Step 13:
The final step is to add your audio and/or subtitles from the original file to the converted file. This process uses muxing, not conversion, so there is no quality loss.
For this we will use the program we installed earlier, MKVMerge.
So run that and drag the converted file into that program, then do the same with the original file. If you can’t drag them on, you can use the add button instead.
Now you have several items in the Tracks, chapters and tags section. You just need to untick the ones you don’t want. Usually you will want to leave them all selected except for the original video track, as I’ve done in the following example:

Finally, set the Output filename down the bottom of the window and click Start muxing.
When that is done, you have your final video!
Final Thoughts:
This might seem like a long process, but actually it is only long once. Since we have now made templates, the process for the videos from now on will be much faster; instead of entering the script each time, now you can just make sure your 60FPS AviSynth script is selected.
This file can now be played just like any other video. I personally watch videos on my TV which is linked up to my computer using the awesome, free program called Universal Media Server, and that handles these 60FPS videos perfectly with no configuration.
Any comments are appreciated. If you can think of an improvement to the script, or to the process, or if you just found it useful and want to say thanks, please do leave a comment. I would love to know that it’s being used.
If you want to donate to help me with server costs and time spent keeping this article updated, you can do so here with my thanks 🙂
FAQ:
- How can I fix random crashing of vfw4x264.exe?
This probably means you are encoding a file using an input mode other than DSS2, which can happen if the clip is .m2ts or .dga (blu-ray) or another uncommon format.
You can fix it by changing the 2 in the second line of the script to either 3, 4, 5 or just removing that line (try them in that order, since the options get progressively slower) - The option “Prefer DSS2 over DirectShowSource” is disabled. or
I get an error like “can’t load avss.dll”.
This means your computer is missing Haali Media Splitter. You can download it here or as part of a K-Lite Mega Codec Pack and the error should go away after you install it. If you install K-Lite, make sure to select “Profile 9: Lots of Stuff” during installation. - The file stops encoding after 99%.
This usually indicates a codec configuration issue. Try installing/reinstalling K-Lite Mega Codec Pack, and make sure to let it select its preferred defaults (not “quick upgrade”) - Can I customize the output framerate to make it 48FPS, 75FPS, 120FPS, or anything else?
Yes, you can choose any framerate you want. It is best to choose a framerate that is divisible in some way with the original video, but even that is your choice. You just need to add the options “NewNum” and “NewDen”, like this:
InterFrame(Cores=Cores, NewNum=48000, NewDen=1001)
NewNum stands for “New Numerator” and NewDen stands for “New Denominator”. In general, with NTSC material the NewDen should be 1001 and the NewNum should be 1000x your desired framerate (so for 48FPS you want 48000 and 1001) while for PAL content you might just want something like NewNum=75,NewDen=1 to output 75FPS content. - The output seems choppy, can I make it smoother?
Yes, by default we output a video that sacrifices a little smoothness in order to reduce errors, but different people’s eyes pick up on different things so it can all be a matter of taste. You can try the Smooth tuning, like this:
InterFrame(Cores=Cores, Tuning="Smooth")
Also, using GPU mode produces more accurate results and therefore should appear smoother, though it can be slightly slower overall. You can try it like this:
InterFrame(Cores=Cores, GPU=true)
Or try both options at once like this:
InterFrame(Cores=Cores, Tuning="Smooth", GPU=true) - Why isn’t the GPU being used much in GPU mode?
Only some things are done with the GPU in GPU mode, it’s still mostly done by CPU but helped by GPU. - Why is the video still the original framerate after running it through MKVMerge?
You probably selected the wrong tracks in MKVMerge so you’re getting the original video track instead of the new one; make sure you untick the original video stream before muxing. - Why does MeGUI give an error “SVSmoothFPS: unable to load library given in ‘compose’ […svpflow2.dll]
Try re-installing or updating your video card drivers, and if that doesn’t work then maybe your video card doesn’t support OpenCL so remove GPU=true from your script. - Why am I getting the error “SVSmoothFps: unable to load library given in ‘compose'” when I try to run the encoding process, but not when I preview?
Go into your MeGUI tools folder (usually C:\Program Files (x86)\MeGUI\tools\x264) and rename the file opencl.dll to opencl.dll.bak. This will let MeGUI use the version of opencl.dll that your video card drivers have installed, instead of the generic one from MeGUI. - Why am I getting the error “Error message for your reference: Can not read the video stream”?
MeGUI can’t read from folders or files with certain characters, so try moving the video to a different folder and/or renaming the file.
Thanks:
Widezu69 for providing the original AviSynth script that I used as a base.
Fizick for MVTools, the library that does all the work, and SVP for the modifications to MVTools that make it even better for our purposes.
Everyone on various forums for their feedback, this is really a community effort.
Changelog:
21/05/2015:
- Updated InterFrame to 2.8.2, which improves speed
16/03/2015:
- Corrected and improved the instructions and FAQ
05/03/2015:
- Updated InterFrame to 2.8.0, which improves speed and lowers memory usage
- Updated conversion script
24/02/2015:
- Updated the instructions and FAQ
27/09/2014:
- Updated InterFrame to 2.6.0
- Added a tip about using framedoubling mode
- Updated most images to reflect the minor changes to MeGUI
- Minor improvements to instructions
22/07/2014:
- Added more items to the FAQ
10/07/2014:
- Added more items to the FAQ
- Shortened the changelog to only the latest 3 changes by default
20/05/2014:
- Updated instructions
- Added more tips
- Added to and updated the FAQ
- Updated the link to MKVToolnix to always point to the latest version
October 25, 2014 at 1:57 pm
Hey, great guide here but I was just wondering if there is any way to stop the script from automatically cropping out the black backgrounds on youtube videos? It makes it less than 1080p and that makes me sad ;c.
October 25, 2014 at 3:57 pm
it worked for me..i tried it with a snippet from Anchroman 2 (because my CPU is garbba
October 25, 2014 at 4:04 pm
it worked ..i’ve tried it with a snippet ( (because my CPU is garbage it takes at least two hours to convert the whole movie) from Anchorman 2…it looks silky smooth
October 30, 2014 at 6:18 am
When i press queue on the input tab after doing all the steps it says I need audio input,output and settings configured but they are blank. I’m taking it one of the files i downloaded at the start was meant to do this for me but it isnt? What do i do now as I cant go past this step without knowing what to select for those.
October 31, 2014 at 6:11 am
I don’t know how to change the lines to “Program Files” i am running a windows 32bit machine
November 1, 2014 at 9:53 am
Hello i’m going to sound like a plum as everything is working ok but want to try to make the video smoother by using the InterFrame(Tuning=”Smooth”) but not sure where to put in script
Do i just add InterFrame(Tuning=”Smooth”) at bottom of script just below InterFrame(Cores=4) or does it have to be added to the InterFrame(Cores=4) part
November 1, 2014 at 10:16 pm
I’m using a 144Hz monitor and i would like to at least try watching movies at 144FPS. Is there a way to use this script to convert videos to above 60FPS?
November 2, 2014 at 4:42 pm
@Kokuten I’m glad you got it fixed 🙂
@Chloe that’s great 🙂 You can use the MeGUI script creator to resize, or you can manually replace the line <resize> with something like Spline36Resize(1280,720)
@Stephen Looks like a codec issue, you can try (re)installing K-Lite Mega
@Anime Viewer thanks, I’ll try to make it clearer
@TheFakeCake the script doesn’t automatically crop anything, it probably just means that the video didn’t have black bars in the first place (YouTube will add black bars to its video player just because it’s better to have a color than transparency).
You can add black bars if you want but I don’t recommend it, and even a video that is 1920×2 is still 1080p by the way – 1080p is a movie that has either 1920px width or 1080px height, doesn’t have to be both 🙂
@DJ it looks like you’re pressing “AutoEncode” instead of “Queue” 🙂
@Tony I’m not sure what you mean, you just use the keyboard like normal 🙂
@Eyerex like this: InterFrame(Cores=4, Tuning=”Smooth”) 🙂
@Rokushino please see the fourth point in the FAQ section 🙂
November 2, 2014 at 11:28 pm
Thanks so much! I’ve been using SVP for live playback, but want to convert some of my movies to 48fps (the hobbit of course), so I can play them anywhere. Works perfectly!
November 3, 2014 at 4:51 pm
I am stuck on Step 10. I was wondering if you can help or if you have any idea.
On step 10 when I click save I get this message: http://gyazo.com/2e3cc7d09954b6cb5120acdc95a59d4b
If you know a fix for this, that will be greatly appreciated. Thank you.
November 3, 2014 at 8:26 pm
I have a problem. Do you knwo what can I do about this?
Here
November 4, 2014 at 5:10 am
moi j’ais un problème avec mes vidéos! je suis bloqué à l’étape 9! lorsque je clique sur une vidéo,le logiciel m’indique cela: The file DirectShowSource(“C:\Users\ANY-3D\Downloads\[ReinForce] Tokyo Ghoul – Vol.1 (BDRip 1920x1080p x264 FLAC)\Extra\PV\PV4.mkv”, audio=false, convertfps=true) cannot be opened.
Please make sure it’s a valid AviSynth script and that AviSynth is properly installed.
You can check the validity of your script and AviSynth installation by opening the file in your favorite media player.
If that works, try opening the video in VirtualDub(Mod) as well. If the former works and the latter doesn’t, install a YV12 codec.
Error message for your reference: Impossible de charger la DLL ‘AviSynthWrapper’: Le module spécifié est introuvable. (Exception de HRESULT: 0x8007007E)
November 4, 2014 at 12:47 pm
I have a peculiar problem: my video preview is grey without giving video, and when the job is started (mux-ing is job 2 on it as well?), it produces a file of 5– kb and is grey. ‘Prefer DSS2 over DirectShowSource’ was not a clickable option, so I will try your troubleshooting guidance firstly.
November 4, 2014 at 1:54 pm
Hi! Thanks a bunch for this guide! I have a question though. For every single one of my videos, after I create the Avisynth script, the video comes out with flashing colors. Like it’ll be flashing from the normal color to black and white. I tried unchecking and checking the color correction box in the script but it doesn’t change anything. I was wondering if I screwed up something in the script/settings or if the videos I’m using just aren’t perfect for the program (I’m using .mkv files). Thanks again for this awesome guide!
November 5, 2014 at 1:53 am
Is there a way to convert a stereoscopic video in over-under format (1920*2160) without it being squished to 1080p?
November 5, 2014 at 2:23 pm
@Mithy it shouldn’t get squished in any circumstances. For OU content we just halve the video and separate interpolation on each half, we don’t change resolution at all 🙂
@jejh @Arman @Luke try installing K-Lite Mega, it sounds like a codec is missing or not configured properly 🙂
@Gibson what’s the problem?
@Michael thanks for the feedback 😀
November 6, 2014 at 4:19 am
All that happens in Step 9 is that MeGUI refuses to open a video file, gives an error message saying that none of valid video files i’m loading are valid, then stops responding and crashes.
November 6, 2014 at 10:23 am
It gets stuck right after it starts preprocessing at 0,00 % without any error message. How to fix it?
November 6, 2014 at 10:28 am
@SubJunk
Thanks for the reply! The problem was that the video was actually Half-OU set to 8:9 aspect ratio, so all I needed to do was fix the AR with mkvmerge after conversion.
November 6, 2014 at 11:27 am
Hmmm I still have the same problem after reinstalling the K-Lite Mega pack. Could there be something that I have to change?
November 10, 2014 at 2:27 am
I have same problem as Arman here
http://www.spirton.com/convert-videos-to-60fps/comment-page-20/#comment-44765
What should i do with it?
November 10, 2014 at 10:25 am
hey bro, everything is just fine until i get an error message while opening the video file in Avisynth Script editor,
it says ( Could not open the bla bla bla…., the file name, directory name, or volume label syntax is incorrect)
how do i solve this?
thanks BTW
November 11, 2014 at 5:07 am
Question regarding script code “.ConvertToYV12()”
Shouldn’t it be:
”
ConvertToYV12()”
And one more about SetMTMode (2). Should it really be after ConvertToYV12() or it should be right before? Because Xvid4PSP puts it before and SVP developers suggest it to put right before.
TY!
November 20, 2014 at 11:51 am
Thank a lot!!!
Can you make a VideoTutorial of this beautiful guide?
November 21, 2014 at 4:07 pm
For those getting the “can’t read the video stream” error message :
If you have added “GPU=true” in the script, remove it.
November 21, 2014 at 9:38 pm
@REM1X @iwrtu @jejh you can installing a newer version of K-Lite or installing it in Safe Mode, or selecting different decoding options in the advanced K-Lite settings for the problematic filetypes.
@Andrew it could mean there’s a special character in the filename, or just that it’s wrong
@Ajvar I don’t think it makes a difference? I’m open to comments and improvements if it turns out there’s a better way 🙂
@Jacopo I don’t have plans to do a video, you can do it if you want 🙂
@MMM I’ve started a thread on the SVP forums to try to fix this issue, we aren’t sure yet what causes it but it may be recent video card drivers. The thread is here if you want to join http://www.svp-team.com/forum/viewtopic.php?id=2233
November 25, 2014 at 1:04 pm
Hi,
Is there any disadvantage to using MP4 instead of MKV? After the video is done encoding, I rip the audio from the original file, then throw it into the 60 FPS file using ffmpeg:
$ ffmpeg -i [original].mp4 -vn -c copy [audio].m4a$ ffmpeg -i [60FPS].mp4 -i [audio].m4a -c copy [output].mp4
Thanks!
November 26, 2014 at 3:56 pm
@Lacedaemon MP4 and MKV both have advantages. If a device can handle both, MKV is better since it has less overhead and is made to be streaming-friendly, whereas MP4 has more overhead and doesn’t stream well without significant hacks, but MP4 is more widely supported especially on older hardware so it’s always a tradeoff. I’d say it depends on your usage scenario. For me I always choose MKV.
November 27, 2014 at 1:05 pm
Thanks for this guide. Unfortunately, I have OSX (Yosemite).
– Is there a guide for OSX?
– Or is there a simple application that takes in 30fps files and outputs 60fps versions of them with a single button click?
Something like that would be amazing!
November 29, 2014 at 8:38 am
Help me Please! “Error=0x7e svpflow1.dll” T^T”
http://image.ohozaa.com/view2/xZZjTjrqTGTRyqTY
November 29, 2014 at 11:50 am
Hi SubJunk,
can you assist me to convert video to 60fps? i was trying the procedure you made but i failed. i was in step 12 but error in conversation. do you have a video guide for it?
TIA!
December 1, 2014 at 5:17 am
I rendered a 34 minute video with GPU rendering enabled and it took 13 hours. That’s ridiculous, I have an Nvidia GTX 760 graphics card. It seems as if GPU rendering isn’t working. Any ideas?
December 3, 2014 at 7:37 am
I’m stuck in step 9, the software not accept videos by sending me this message when I put the video:
The file DirectShowSource(“C:\Users\ANY-3D\Downloads\[ReinForce] Tokyo Ghoul – Vol.1 (BDRip 1920x1080p x264 FLAC)\Extra\PV\PV4.mkv”, audio=false, convertfps=true) cannot be opened.
Please make sure it’s a valid AviSynth script and that AviSynth is properly installed.
You can check the validity of your script and AviSynth installation by opening the file in your favorite media player.
If that works, try opening the video in VirtualDub(Mod) as well. If the former works and the latter doesn’t, install a YV12 codec.
Error message for your reference: Impossible de charger la DLL ‘AviSynthWrapper’: Le module spécifié est introuvable. (Exception de HRESULT: 0x8007007E)
December 4, 2014 at 12:20 pm
Hi,
I’m trying to watch anime using SVP and want to convert the video to 60fps using your guide.
But my content has to go trough ‘livestreamer’ ( http://livestreamer.readthedocs.org/ ).
How do I do this?
Thanks!
December 5, 2014 at 6:02 pm
Thanks for the answer @SubJunk! One more thing: why, during fast-moving scenes, does the video “pixelate”? See here: http://imgur.com/9YUfUbt.gifv
Thanks again!
December 6, 2014 at 2:30 am
Hi, i have two questions:
1) Isn’t there a way to make a giant batch file to execute al this after you’ve set it all up. A batch file that just asks for original file and then the. Output location.
2) I want to convert anime episodes using your guide. How can I apply these settings ( http://www.svp-team.com/wiki/Watching_anime ) when using your guide? (Or does your way of doing it just use the svp profile that is selected in the svp manager?)
December 11, 2014 at 2:19 pm
Hey, I’m trying to make wmv videos 60 fps, but it doesn’t seem to be working — it freezes at 99% every time. Because it’s WMV, MKVmerge can’t demux it either. Am I stuck with having to transcode to x264 mp4 or is there a way to make megui handle wmv?
December 12, 2014 at 8:42 am
I have problem with converting 1080p movies. Every time I try to convert a movie and preview it, it looks slowed down and is at @ 17-25fps not 60fps. Should I wait for it to finish converting or is there a settings I need to change?
December 12, 2014 at 1:30 pm
Awesome guide, but the beginning of my video(audio works) always seems broken (roughly 5-7 seconds) then the rest is fine. Any idea on what I may be doing wrong?
December 14, 2014 at 9:21 pm
I have tried this on multiple videos. The picture quality has worked out excellently, but the audio desyncs a lot. I understand that I am upping the number of frames per second, but is there any way to decrease the audio desync? I have followed all of the steps to the best of my abilities. I just want to know so that I can have the audio be closer than several seconds ahead every time.
December 14, 2014 at 10:20 pm
Hey, great work but I am getting an error when I select my video input. I downloaded a 4k res 5min clip but it cant seem to process it. The error is: avisynth script error directshowsource timeout waiting graph start
My custom pc should be able to handle it so that shouldn’t be the problem.
Thanks!
December 22, 2014 at 12:31 am
Nice it works but I convert mp4 and the sound it doesn’t work.
Conversion is very slow 4 gb movie it takes 7 hours and file size 150 gb
December 25, 2014 at 12:07 am
Hi, thank you for this tutorial! But is there any way to do this on a mac?
December 28, 2014 at 9:37 pm
Hello I am trying to encode anime with this tutorial and I keep getting a run time error. It only showed once and never appeared again after I tried again. These is my script:
LoadPlugin(“C:\Users\Lyranx\Documents\Apps\MeGUI\tools\avisynth_plugin\VSFilter.dll”)
Setmemorymax(512)
SetMTMode(3,4)
LoadPlugin(“C:\Users\Lyranx\Documents\Apps\MeGUI\tools\avisynth_plugin\svpflow1.dll”)
LoadPlugin(“C:\Users\Lyranx\Documents\Apps\MeGUI\tools\avisynth_plugin\svpflow2.dll”)
Import(“C:\Users\Lyranx\Documents\Apps\MeGUI\tools\avisynth_plugin\InterFrame2.avsi”)
.ConvertToYV12()
SetMTMode(2)
InterFrame(Cores=4, GPU=true, Tuning=”Smooth”)
textsub(“”)
the VSFilter and textsub is for hardcoding subtitles. And it gets an error for not understanding Smooth or the quotes for Smooth.
Any help with this?
December 29, 2014 at 7:56 pm
@Cor sorry but AviSynth isn’t on OS X so no, but you can use it by emulating Windows on your Mac 🙂
@DANU is the file svpflow1.dll in that folder?
@KissmharL sorry there’s no video guide
@Ethan Brown I haven’t noticed that myself, it might have been a poorly-formatted version of Godzilla? What was the filename?
@rUnRiOt even when using GPU mode, it’s largely done with CPU. GPU just does a little bit to enhance precision.
@KS maybe try re-installing AviSynth?
December 29, 2014 at 8:03 pm
@Thibault sorry I don’t know about livestreamer. There is a GUI that can do batch operations, called InterFrameGUI. If you look at the InterFrame documentation (link is on this website) you’ll find an anime mode, it’s not the same as SVP’s; in my opinion it is better than that one. The SVP one results in possibly less artifacts but more jerky motion.
@Lacedaemon you can try using Tuning=”Smooth” to minimize the pixelation 🙂
@WMV?! that will be a codec issue, try changing the codec settings so different software reads the WMV files. If you use K-Lite Mega Codec Pack it comes with tools to do that.
@Chris yeah that’s just the preview, the actual result will be normal
@Ethan if the audio desyncs it’s probably because of the input video, like maybe it has a variable framerate. Audio desync doesn’t normally happen.
December 29, 2014 at 8:11 pm
@Luca you will have a hard time getting 4k video to work, since this was all developed before 4k existed, and AviSynth is bad at managing memory (and a lot of memory is needed for 4k video). I recommend putting a resize line at the beginning of the script, like Spline36Resize(1920,1080), to rescale to 1080p instead of 2160p.
@Sustav remember to mux the sound at the end, and use a higher CRF value to get smaller filesize. 16+
@wd no sorry, AviSynth doesn’t work on Mac, unless you emulate Windows.
@Anime Encoder make sure the quotation marks are normal vertical ones instead of slanted ones
January 1, 2015 at 3:18 am
Hi! Thanks very much for this tutorial. I converted my Avengers blu ray and the result is kinda good. Unfortunately, there is some “pixelisation” or “slowdonws” here and there, most of the time on contrasted scenes, or when multiple objects move in different directions and when the camera moves at very high speed. Is there any way to improve these issues, even if it would take a little bit longer to convert the file? Thanks again!
January 4, 2015 at 3:24 am
I was getting the same errors as some people before;
“The file C:\Users\____\Videos\_____.avs cannot be opened. Please make sure it’s a valid AviSynth script and that AviSynth is properly installed
Error message for your reference : Can’t read the video stream”
and also “there’s no function named setmtmode”
So what I did was to erase lines 2 and 13 containing “SetMTMode” in the script: SetMTMode(3,4) and SetMTMode(2)
and everything works just fine. I get that silky smooth 60fps.
There’s also one strange thing. I had CCCP codec pack and I’ve manually installed ffdshow and haali media splitter and the checkbox for “Prefer DSS2 over DirectShowSource” was enabled. But at time I was till getting the errors mentioned before, so I uninstalled everything and installed the K-Lite Codec Pack MEGA with Profile #9 and the checkbox is now disabled….
January 4, 2015 at 5:59 pm
For all the people having the “Make sure avisynth is properly installed” error issue. I fixed it by undoing my edits to the script in step 7. If you have this error, try undoing your edits and using the script as it appears exactly in step 7.