Sections:
Introduction:
Many modern TVs now include an extra frames feature, usually either 120Hz or 240Hz. This just means they take the source video, which is usually between 24-30FPS, and add new, interpolated frames between the original frames that make the motion look much more smooth.
High framerate (HFR at 48fps) was used in The Hobbit and will be used in upcoming films like the Avatar sequels, so why not watch all your movies at higher framerates?
A lot of people don’t realize this, but 99% of TVs made before this feature was introduced are actually capable of displaying 50FPS and 60FPS, and of course most LCD monitors display 60FPS as well.
This tutorial will allow you to convert videos of any framerate to higher framerates; 25FPS becomes 50FPS and 24/30FPS becomes 60FPS by default, or you can specify whichever framerate you want.
This script offers greater quality than any televisions I have seen.
I’m sure many people will want to see how well this script works, so here’s a comparison:
Original File
Converted File
Note: This can now be done in realtime using Universal Media Server!
Purpose:
This post provides instructions on how to easily convert any video to 60FPS, which allows you to take advantage of this feature of modern TVs on your computer monitor or TV without actually buying anything.
Step 1:
The files needed for this step are found in this zip folder (~3MB).
Run and install the file AviSynth.exe.
It is an early version of AviSynth 2.6 that is more stable and faster for multithreading than 2.5 releases.
Download and install MeGUI, run it, let it update all the things it wants to and import all of the presets.
Optional Tip: If you want MeGUI to update to the very latest stuff (at your own risk) you can push ctrl+s, go to the Extra Configuration tab, and in the Auto Update section select “Use development update server”
Close MeGUI and extract the files in the tools folder from our zip file into your MeGUI tools folder, which for most people will be either C:\Program Files (x86)\MeGUI\tools\ or C:\Program Files\MeGUI\tools\.
Step 2:
Download and install MKVToolnix.
When that is installed, run MKVMerge (Start Menu -> All Programs -> MKVToolnix -> mkvmerge GUI).
You will also need codecs installed. If you don’t already have them I recommend K-Lite Mega Codec Pack. If you install K-Lite, make sure to select “Profile 9: Lots of Stuff” during installation.
Step 3:
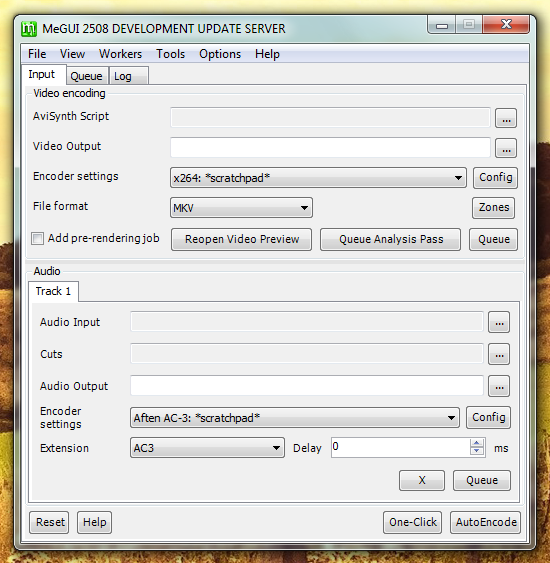
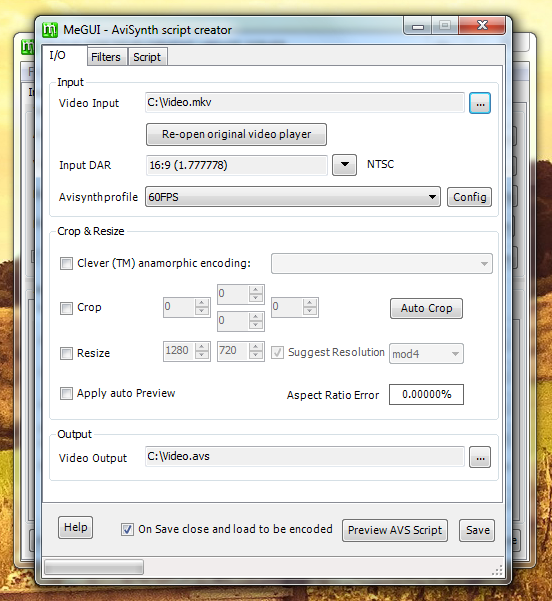
Start MeGUI again. You should be left with a window that looks similar to this:
Step 4:
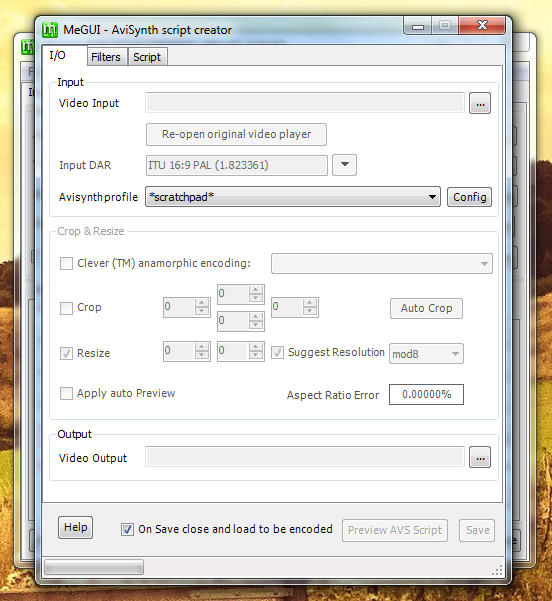
Push ctrl+r, or go to Tools -> AVS Script Creator.
Now you should see something like this:
Step 5:
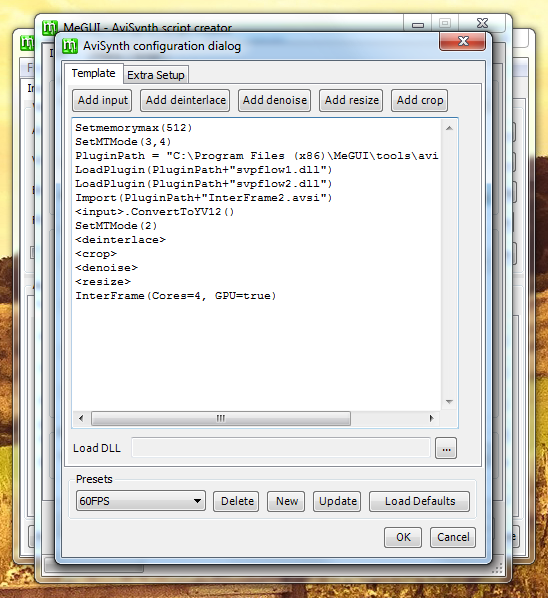
Click the Config button next to Avisynth profile.
It should look like this:

Step 6:
Click the New button down the bottom and type 60FPS in the name box, so it should look like this:

Step 7:
Now for the script that will do the actual 60FPS conversion.
Just copy and paste the following code into the text input area.
Cores=4

SetMemoryMax(512)

SetMTMode(3,Cores)

PluginPath = "C:\Program Files (x86)\MeGUI\tools\avisynth_plugin\"

LoadPlugin(PluginPath+"svpflow1.dll")

LoadPlugin(PluginPath+"svpflow2.dll")

Import(PluginPath+"InterFrame2.avsi")

<input>.ConvertToYV12()

SetMTMode(2)

<deinterlace>

<crop>

<denoise>

<resize>

InterFrame(Cores=Cores)
Important note #1: Make sure the path on the third line is correct.
For example, if you are running 32-bit Windows, you will need to modify the path to “Program Files” instead.
Important note #2: You should change the number “4” in the script (on line 1) to your number of CPU cores. If you don’t know how many cores your CPU has just Google your CPU and you should be able to find the specs somewhere, or 4 should be fine anyway.
Important note #3: If you have a video card, you can improve quality by adding “GPU=true” to the script. However, it may make encoding time slower, so take that into account.
So InterFrame(Cores=Cores) would turn into InterFrame(Cores=Cores, GPU=true)
If you do this, you may also need to go into your MeGUI tools folder (usually C:\Program Files (x86)\MeGUI\tools\x264) and rename the file opencl.dll to opencl.dll.bak. This will let MeGUI use the version of opencl.dll that your video card drivers have installed, instead of the generic one from MeGUI.
Important note #4: This script always outputs either 50FPS or 59.94FPS (60FPS) for compatibility reasons. If you want to always double the framerate instead, so that for example 23.976FPS turns into 47.952FPS (48FPS), you can use the “FrameDouble” parameter.
So InterFrame(Cores=Cores) would turn into InterFrame(Cores=Cores, FrameDouble=true)
So now your window should look similar to this (with different text):
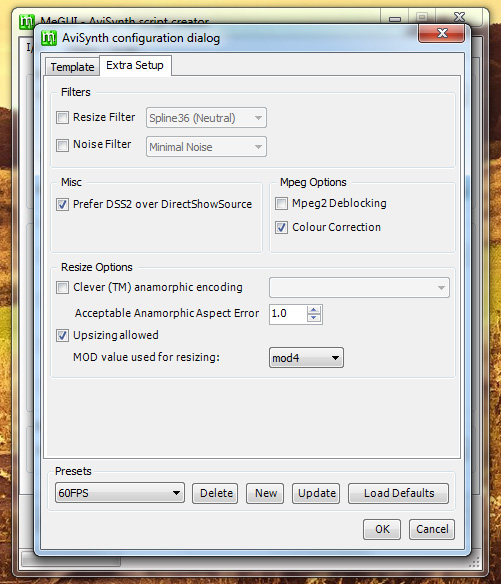
Step 8:
Click the Extra Setup tab and make sure “Prefer DSS2 over DirectShowSource” is checked.
Optional tip #1: You might also want to choose your preferred resizer. For aspect-ratio changes (like from 720×576 to 720×480) a neutral filter like Spline36 will be nice. For actual resizing (like from 1920×1080 to 1280×720) a sharp filter like Spline64 will be best. I usually just leave it on Spline36. Make sure to untick the checkbox on the option after you change the default resizer, otherwise it will always be used by default which is often unnecessary.
Optional tip #2: I recommend changing the “MOD value used for resizing” to mod4. This gives the best balance between compatibility (a lot of devices like PS3 don’t have good mod2 support) and aspect ratio accuracy (the higher the MOD value, the more likely the aspect ratio is to be skewed more heavily).
Now it should look something like this:
Then just click the Update button then the OK button
Step 9:
Now we’re back to the AviSynth script creator window and now that we have our 60FPS AviSynth template made and selected, it’s time to choose which video we want. Just click the … button next to Video Input up the top of the window and find your video, then click Open.
A window will pop up with buttons, click the option on the right, usually either “DirectShowSource” or “AviSource”.
A window will pop up to show you the video, you can just close that.
Now you should see something like this:
Step 10:
Click the Save button. The video preview window might pop up again, you can close it again.
Step 11:
Now is the time when you need to choose the quality of the video and audio.
If you don’t know what to do here, something quick and easy is to just use CRF, which means you let the codec decide on the bitrates itself. So you can click the “Config” button next to the “Encoder settings” dropdown when you have a x264 option selected, then just enter a number between 16-20 in the “Quality” input box. 16 means your video will be almost exactly the same quality as the source, while 20 will look good too while taking up less space. Personally I use 16 for everything because why not? 🙂
So when you have your quality, click Queue in the Video encoding section.
Step 12:
Now your video is ready for conversion.
Now just go to the Queue tab and click Start down the bottom, then wait for it to finish.

Step 13:
The final step is to add your audio and/or subtitles from the original file to the converted file. This process uses muxing, not conversion, so there is no quality loss.
For this we will use the program we installed earlier, MKVMerge.
So run that and drag the converted file into that program, then do the same with the original file. If you can’t drag them on, you can use the add button instead.
Now you have several items in the Tracks, chapters and tags section. You just need to untick the ones you don’t want. Usually you will want to leave them all selected except for the original video track, as I’ve done in the following example:

Finally, set the Output filename down the bottom of the window and click Start muxing.
When that is done, you have your final video!
Final Thoughts:
This might seem like a long process, but actually it is only long once. Since we have now made templates, the process for the videos from now on will be much faster; instead of entering the script each time, now you can just make sure your 60FPS AviSynth script is selected.
This file can now be played just like any other video. I personally watch videos on my TV which is linked up to my computer using the awesome, free program called Universal Media Server, and that handles these 60FPS videos perfectly with no configuration.
Any comments are appreciated. If you can think of an improvement to the script, or to the process, or if you just found it useful and want to say thanks, please do leave a comment. I would love to know that it’s being used.
If you want to donate to help me with server costs and time spent keeping this article updated, you can do so here with my thanks 🙂
FAQ:
- How can I fix random crashing of vfw4x264.exe?
This probably means you are encoding a file using an input mode other than DSS2, which can happen if the clip is .m2ts or .dga (blu-ray) or another uncommon format.
You can fix it by changing the 2 in the second line of the script to either 3, 4, 5 or just removing that line (try them in that order, since the options get progressively slower) - The option “Prefer DSS2 over DirectShowSource” is disabled. or
I get an error like “can’t load avss.dll”.
This means your computer is missing Haali Media Splitter. You can download it here or as part of a K-Lite Mega Codec Pack and the error should go away after you install it. If you install K-Lite, make sure to select “Profile 9: Lots of Stuff” during installation. - The file stops encoding after 99%.
This usually indicates a codec configuration issue. Try installing/reinstalling K-Lite Mega Codec Pack, and make sure to let it select its preferred defaults (not “quick upgrade”) - Can I customize the output framerate to make it 48FPS, 75FPS, 120FPS, or anything else?
Yes, you can choose any framerate you want. It is best to choose a framerate that is divisible in some way with the original video, but even that is your choice. You just need to add the options “NewNum” and “NewDen”, like this:
InterFrame(Cores=Cores, NewNum=48000, NewDen=1001)
NewNum stands for “New Numerator” and NewDen stands for “New Denominator”. In general, with NTSC material the NewDen should be 1001 and the NewNum should be 1000x your desired framerate (so for 48FPS you want 48000 and 1001) while for PAL content you might just want something like NewNum=75,NewDen=1 to output 75FPS content. - The output seems choppy, can I make it smoother?
Yes, by default we output a video that sacrifices a little smoothness in order to reduce errors, but different people’s eyes pick up on different things so it can all be a matter of taste. You can try the Smooth tuning, like this:
InterFrame(Cores=Cores, Tuning="Smooth")
Also, using GPU mode produces more accurate results and therefore should appear smoother, though it can be slightly slower overall. You can try it like this:
InterFrame(Cores=Cores, GPU=true)
Or try both options at once like this:
InterFrame(Cores=Cores, Tuning="Smooth", GPU=true) - Why isn’t the GPU being used much in GPU mode?
Only some things are done with the GPU in GPU mode, it’s still mostly done by CPU but helped by GPU. - Why is the video still the original framerate after running it through MKVMerge?
You probably selected the wrong tracks in MKVMerge so you’re getting the original video track instead of the new one; make sure you untick the original video stream before muxing. - Why does MeGUI give an error “SVSmoothFPS: unable to load library given in ‘compose’ […svpflow2.dll]
Try re-installing or updating your video card drivers, and if that doesn’t work then maybe your video card doesn’t support OpenCL so remove GPU=true from your script. - Why am I getting the error “SVSmoothFps: unable to load library given in ‘compose'” when I try to run the encoding process, but not when I preview?
Go into your MeGUI tools folder (usually C:\Program Files (x86)\MeGUI\tools\x264) and rename the file opencl.dll to opencl.dll.bak. This will let MeGUI use the version of opencl.dll that your video card drivers have installed, instead of the generic one from MeGUI. - Why am I getting the error “Error message for your reference: Can not read the video stream”?
MeGUI can’t read from folders or files with certain characters, so try moving the video to a different folder and/or renaming the file.
Thanks:
Widezu69 for providing the original AviSynth script that I used as a base.
Fizick for MVTools, the library that does all the work, and SVP for the modifications to MVTools that make it even better for our purposes.
Everyone on various forums for their feedback, this is really a community effort.
Changelog:
21/05/2015:
- Updated InterFrame to 2.8.2, which improves speed
16/03/2015:
- Corrected and improved the instructions and FAQ
05/03/2015:
- Updated InterFrame to 2.8.0, which improves speed and lowers memory usage
- Updated conversion script
24/02/2015:
- Updated the instructions and FAQ
27/09/2014:
- Updated InterFrame to 2.6.0
- Added a tip about using framedoubling mode
- Updated most images to reflect the minor changes to MeGUI
- Minor improvements to instructions
22/07/2014:
- Added more items to the FAQ
10/07/2014:
- Added more items to the FAQ
- Shortened the changelog to only the latest 3 changes by default
20/05/2014:
- Updated instructions
- Added more tips
- Added to and updated the FAQ
- Updated the link to MKVToolnix to always point to the latest version
October 16, 2010 at 11:17 pm
My encoding stops at 98,6 % after an hour. Iam trying to convert 200 mb file, how long should it normally take to encode such a small file with high settings.
October 20, 2010 at 5:42 am
It is normal some flaws make the video after encoding with the script? Stayed in
missed some points and a half grid. Others were perfect. thanks
October 21, 2010 at 8:18 am
Hi Jarno,
I can’t say how long it should take, but it should never stop at any point. Try reinstalling codecs, and try to avoid doing demanding things while encoding (like playing CPU-heavy games), since sometimes that can make it stop.
October 26, 2010 at 8:09 pm
Hello,
When trying to use this tutorial to add frames to your “Original” MKV that you have in the beginning of the write up, MeGUI crashes with the error: invalid arguments to function “ssrc”. I used the Avatar “Original” MKV only as a way of testing this as I have no short clips myself. K-lite codec pack is installed. When converting only the video there are no problems. All available audio encoders result in a crash. Have you experienced this? Any solutions?
October 27, 2010 at 1:55 pm
Hi Steven,
There is no audio in the original clip.
October 28, 2010 at 3:09 am
Which method to convert dvd’s, which are in vob files? thanks
October 28, 2010 at 10:31 am
Hi Christiano,
You can use MeGUI’s File Indexer (Ctrl+F2 in the program)
October 29, 2010 at 6:34 pm
The new scripts are great! Thanks!
October 29, 2010 at 6:41 pm
Hey redman, thanks for the feedback! Glad you like them 🙂
November 11, 2010 at 3:42 am
After the updates I had improvements in the results of videos. Solved some
bugs that appeared. But I can not convert videos in 1080p yet. He says it is
unbearable or that the application is already open in another process. I do not understand this.
Thanks
November 11, 2010 at 5:24 pm
Hi Christiano,
I haven’t seen that error before. It might mean you don’t have enough RAM but I don’t know.
November 19, 2010 at 1:54 am
I converted a movie that was in 1080p. “Iron Man 2.” But the
play on the PS3, it ran crashing. Question: The PS3 can run movies
1080p 60fps? Congratulations for the site and keep up to date. The script is getting better. thanks!
November 19, 2010 at 9:20 am
Is that using PS3 Media Server or playing directly on the PS3?
Thanks for the kind words 🙂
November 20, 2010 at 1:24 am
I use directly on the PS3. I always leave the files with the extension m2ts.
November 20, 2010 at 8:59 am
Try using PS3 Media Server 🙂
November 21, 2010 at 5:57 pm
Any idea why .wmv files are stuck encoding the last second of a video?
November 22, 2010 at 10:26 am
Probably a codec thing. Try uninstalling your codec pack/s, restart the computer, then install a different one
December 14, 2010 at 12:04 pm
Can someone please help? I’m trying to convert my videos to 60 fps. But I get an error that says there’s no such function name SetMTMode. Then I removed that line. Then another error message came up and says MSuper: Clip must by YV12 or YUY2. Is there a fix for this?
December 14, 2010 at 12:41 pm
Hi Sidder 🙂 It seems like that error would be caused by the wrong files. Please double-check that you followed Step 1 exactly 🙂
December 14, 2010 at 6:23 pm
I followed Step 1 exactly and all other steps exactly, I still get an error that says “MSuper: Clip Must be YV12 or YUY2”. Is there a way to fix this?
December 14, 2010 at 6:28 pm
The “there’s no such function name SetMTMode” error you described is caused by the program using the wrong avisynth.dll file.
Make sure you have overwritten the original avisynth.dll with the downloaded one.
You can paste it to both the folders (System32 and SysWOW64) to be sure.
December 14, 2010 at 6:48 pm
I already pasted the avisynth file in the system folder. I’m not getting that SetMTMode error anymore. I’m only getting an “MSuper: Clip Must be YV12 or YUY2” error message. I’m trying to encode a raw uncompressed AVI file recorded at 29.97fps that was recorded from my TV Tuner. Is there another to fix this without getting this error message again.
December 14, 2010 at 6:50 pm
Are you not getting the error anymore because you removed the SetMTMode line from the script, or is the line still in the script?
December 14, 2010 at 6:57 pm
No, I didn’t remove the SetMTMode line. I left it in the script after pasted the newer avisynth.dll to system32 and sysWOW64 folders. I’m only getting the “MSuper: Clip Must be YV12 or YUY2″ error message” I’m trying use your method of encoding so my video file is encoded at 60fps as my TV Tuner won’t record anymore than 29.97fps when output into a raw umcompressed AVI.
December 14, 2010 at 7:00 pm
Ah I see, cool 🙂
Well the error is related to the colours of the video. Try to move the line “ConvertToYV12()” to before the MSuper line. It may give you an error when you do that, in which case you can do 2 conversions (convert your clip to YV12 first, then load the new file using the 60fps script).
Hopefully that makes sense 🙂
December 14, 2010 at 7:04 pm
Ah! Thanks! I think this fixed it. After I moved the ConvertToYV12(), I no longer see any error messages. Thanks.
December 14, 2010 at 7:05 pm
Cool, glad I could help 🙂
December 21, 2010 at 11:27 am
No seu exemplo, seu arquivo nem dobrou de tamanho mas, aqui com um arquivo de 50mb, ele cresceu para 300mb!
É normal isso?
December 25, 2010 at 3:21 pm
Everything worked perfectly! Even a dummy as myself got it from the first try. Thank you SubJunk!
I just wonder how come my new 60FPS video file is smaller then the original (apprx 55% of the original size).
December 29, 2010 at 3:38 pm
thaaaaaaaaaaaank you so much for this tutorial. now i can watch my videos on 60 fps hahaha. btw, is there a way to make the conversion process faster? 😀
December 30, 2010 at 4:57 pm
thank you very much! but can i like pause the conversion and continue it on the other day?
January 2, 2011 at 1:40 pm
@pyro: You’re very welcome 🙂 MeGUI doesn’t support pausing. Maybe it will in the future.
@erick: Glad you like it 😀
You can make it faster by getting faster hardware or overclocking hehe 🙂
@Tom: Great, thanks a lot for the feedback 🙂
If the visible quality of the files are the same, it probably means the original file was using an inferior codec or codec settings.
@vulcan: You’re welcome 😀
@edilvan: Sorry, I only speak English 🙂
January 11, 2011 at 2:11 am
Well thanks for the script. Actually I created the script and opened it in Vdub instead of recoding with MEgui. Vdub opened the file without a problem and looking up the file information told me that it was in 60fps so I could actually play it back in that frame rate through Vdub right there, even before recoding it.
Two questions though:
1: Is it normal if it doesn’t open WMV’s?
2: I have a 25fps file and opening it in Vdub through the script doesn’t change the frame rate. Vdub still tells me that the file is in 25fps but if I try to play it back the sound is slowed down…?
Thanks for the input
January 11, 2011 at 8:32 am
@Phil: Hi 🙂
If you would like a realtime guide there is one here.
Unfortunately the quality will be lower than with this script and that is the reason for the creation of this guide; so that anyone can watch the smoothing at the highest quality with any computer instead of being bound to their hardware 🙂
1) WMV’s are notoriously problematic! The answer is no, it’s not normal, but it’s a common problem 🙂 I suggest wiping all codecs from your system then installing the latest K-Lite Mega Codec Pack, without the 64-bit addon.
2) It’s possible that Vdub doesn’t handle Avisynth scripts as nicely as MeGUI. I suggest just using MeGUI.
January 13, 2011 at 7:14 am
How to get more Quality? How can i change it?
January 14, 2011 at 2:40 pm
@Ipman: This script is the highest quality I’m aware of
January 15, 2011 at 1:49 pm
Thanks for your reply and the link.
Got another question here:
Is there a way to double the frame rate and not put everything in 60. I have files that are in 24 and 25 and I would love them to become 48 and 50 respectively. In my opinion what was shot in 24/25 looks better converted to 48/50 rather than 60
Anyway you tip about achieving this and/or your feedback on my opinion is appreciated.
Thanks
January 15, 2011 at 2:07 pm
@Phil: You’re welcome 🙂
The script already makes 25fps content 50fps, 30fps content 60fps, and all others (like 29.97fps and 23.976fps) 59.94fps (that is what lines 17-25 do).
This is to maintain compatibility with TVs, since TVs usually support 50Hz-60Hz but not 47.952fps.
However it is up to you what you prefer, so to make it always double the framerate you can change this part of the Quality Script:
Framerate == 25 ? Eval("""MFlowFps(super, backward_3, forward_3, num=50, den=1, ml=10000)
""") : \
Framerate == 30 ? Eval("""
MFlowFps(super, backward_3, forward_3, num=60, den=1, ml=10000)
""") \
: Eval("""
MFlowFps(super, backward_3, forward_3, num=60000, den=1001, ml=10000)
""")
To this:
MFlowFps(super, backward_3, forward_3, num=FrameRateNumerator*2, den=FrameRateDenominator, ml=10000)January 16, 2011 at 2:22 am
Oh so that’s why it rounds it up. Thanks for the modification, I will give it a try.
Well, so far then I am good with pretty much everything except this one problem left. Take a look a this:
http://img703.imageshack.us/i/capturezv.png/
This video plays fine in Media Player, VLC and KMplayer. If I drop it in Vdub it will also look fine. It is only when I open it through the script that the color streaks appear.
Now I gotta say that this file is not the original video. I took the original, dropped it in Sony Vegas, edited, color corrected it and recoded it in Xvid.
If I open the original file, which is an MP4, through the script (modified for MP4 that is) it will look fine. If I recode it this way it will also be fine.
Thing is though, I’ve been using Vegas, professionally, for the last 6 years so I am very efficient with it. So editing and color correcting is a breeze through it whereas through Vdub it’s a drag. Needless to say I’d like to keep my workflow if possible 😉
Any ideas?
January 16, 2011 at 10:46 am
@Phil: I have no experience with Vdub or Vegas so it’s hard for me to say. Sorry I can’t be of more help!
January 17, 2011 at 10:57 pm
The problem was that 852×480 is not 16×16 safe. So, instead of rendering it out of Vegas in 852×480 I had to do it in 848×480.
The recoded file now opens fine in Vdub through the script. So as you can see the problem was not related to either Vegas or Vdub. The file size simply needed to be set to a codec friendly resolution compliant to 16×16 multiples
February 5, 2011 at 2:10 am
Wow, great tool and very clear instructions, thank you very much, this is exactly what I was looking for !
Just One question:
Some TVs can insert frames to movies/videos so they are smooth and do not judder (on my Panasonic G20 it is called “Intelligent Frame Creation”). This however makes movie look different, more like home video – people call it “soap opera effect”. Can I expect the same when converting 23.976 > 60 fps using this script ?
Thanks.
February 5, 2011 at 6:22 am
On AVS Forum (http://www.avsforum.com/avs-vb/showthread.php?p=18890733#post18890733) widezu69 says:
“The script produces an infamous “soap opera” effect because it looks like the stuff seen on tv played at 50i. Some people, like me get used to it after a while, some people don’t. If you are after smooth motion but still with that filmic look, replace the third last line in the script with these lines:…”
The line that applies to 23.796 fps is this I guess:
MBlockFps(super, backward_3, forward_3, num=72000, den=1001)
In case I want to apply this to your Speed script, I suppose it should replace following line with the above(for 23.976fps):
MBlockFps(super, backward_3, forward_3, num=60000, den=1001, mode=0)
(it’s the 3rd line from bottom)
Am I right ?
Thanks
February 7, 2011 at 11:01 am
@glypto: Yes, you’re right. You can either do 72000 or 48000 🙂
February 12, 2011 at 11:46 am
Thank you so much for this, but I need help.
I’m at the step where I must prefer dss2 over direct show source, and the box is shadowed out, as in I can’t check it.
Am I doing something wrong?
February 12, 2011 at 2:50 pm
@Connor: You’re welcome 🙂 Please check the FAQ section of the post
February 23, 2011 at 11:19 pm
hi, i followed everything correctly until the last step.. and i clicked ‘start’ and it says, 9hours remaining. and my cpu is working at 100%, is it normal and should i continue? lol…
February 24, 2011 at 11:34 am
@noobie: Sure, that can be normal. It all depends on how fast your computer is, the resolution and length of the video (higher resolution and longer length take longer), and the codec settings.
You can make it faster by using the “Ultra Fast” x264 preset, which will make the output file larger but will take less time.
February 24, 2011 at 12:14 pm
Hi, could you provide me with a 120hz variant that interpolates anything to 120hz.
Also I have serious problems with megui. It either hangs, or won’t start conversion on video :/ strange as preview, and other progs work fine so it’s not a decoder problem . I’ll try that net framework reinstall later.
February 24, 2011 at 11:18 pm
@ak4115: Hi 🙂 If you want exactly 120FPS, change the value of “num” to 120 and “den” to 1.
If you want the proper, divisible framerate, use num=120000 and den=1001.